

Have you ever been several hours deep into composing or mixing a track, suddenly realising you’ve spent the last 15 minutes adjusting minute parameters on a synth that’s barely audible in the track anyway?
Going down those production holes is a common issue in modern music production; with so many sounds and effect options available to us, we have limitless possibilities, which isn’t always a good thing. Having an abundance of choice often comes with hidden costs if we don’t put constraints in place for ourselves. One area where this is common relates to software instruments. When we keep tracks as MIDI data triggering software instruments, we’re leaving the door open to the time suck of endless tweaking, among other issues.
While MIDI is incredibly powerful for writing and arranging, and it may seem handy that you can open up the software instrument to make changes any time you need, there are several reasons why committing (or bouncing) MIDI tracks to audio can be a significant workflow upgrade. Building this habit can improve the precision of your productions, free up your computer, and boost your creative output.
The Visual Advantage (Seeing the ADSR)
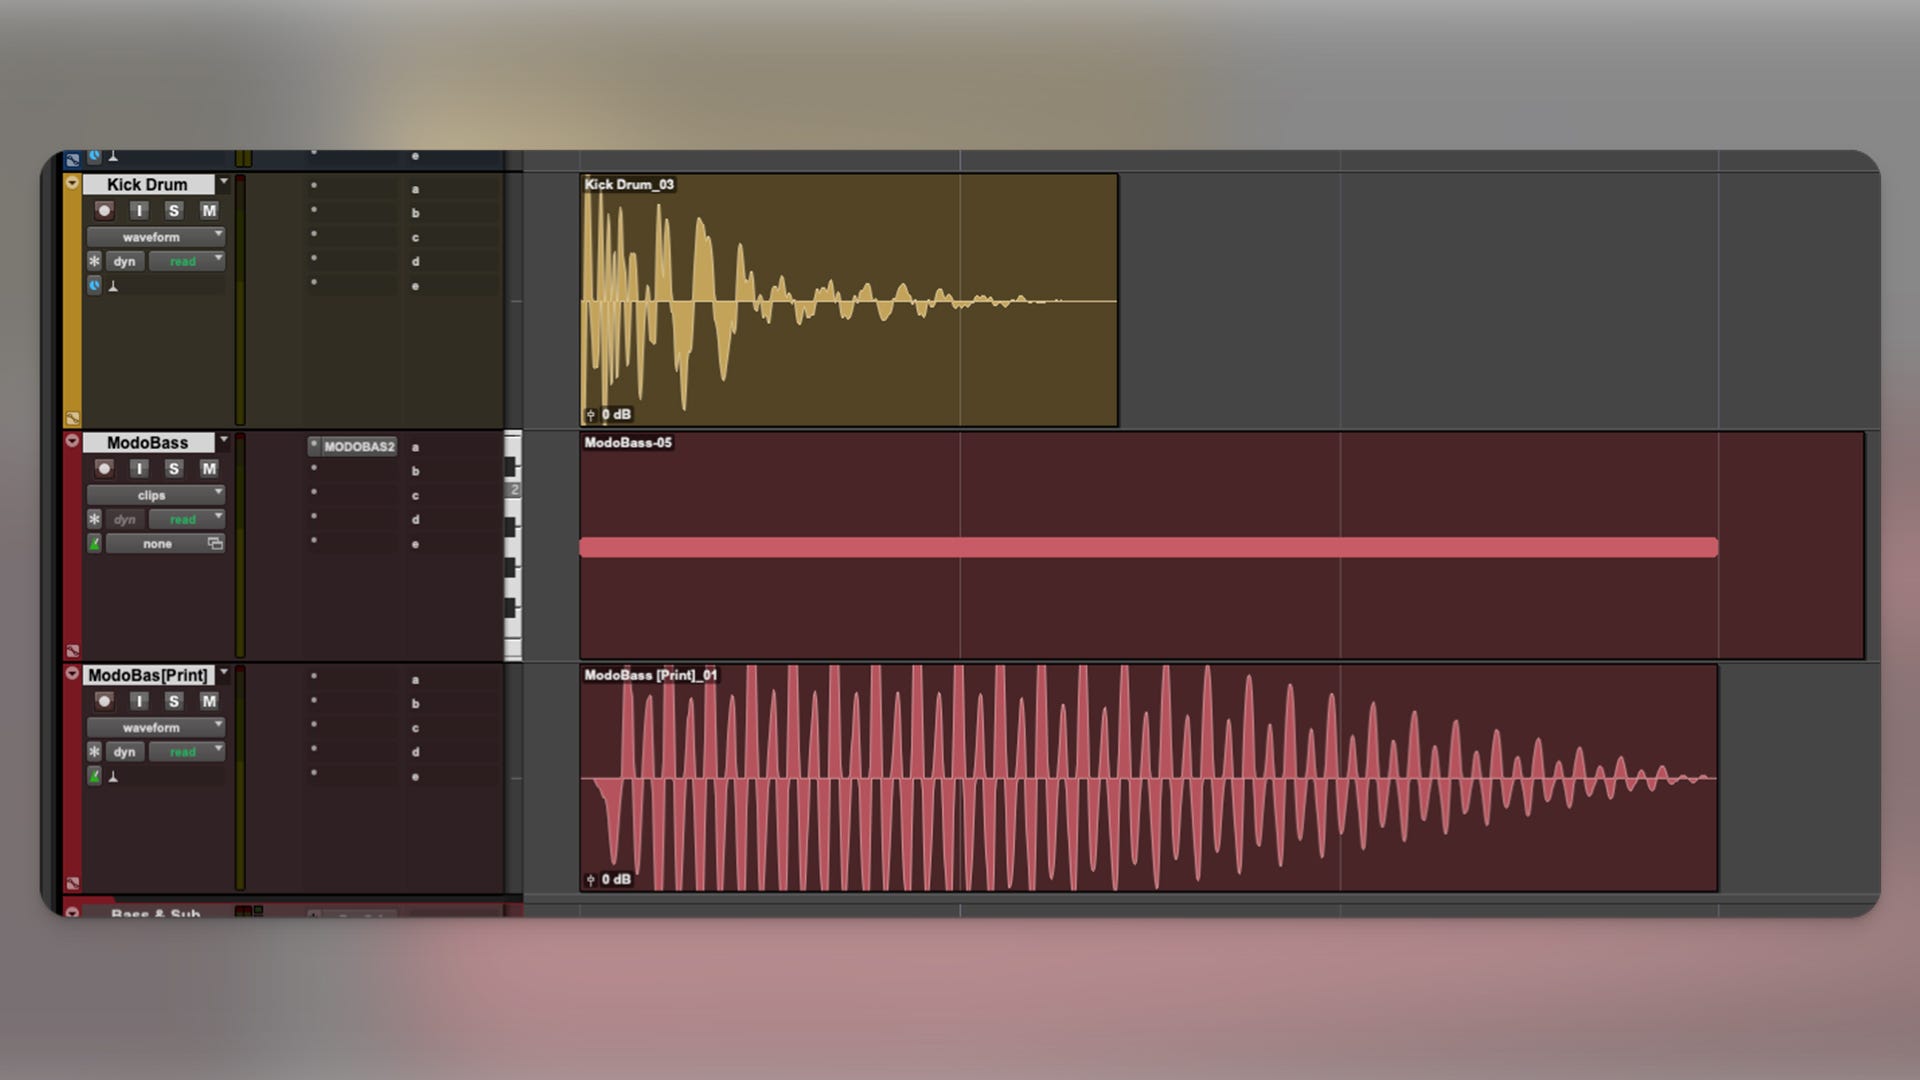
One of the main problems with the MIDI view is that the notes are just flat rectangles. They tell the instrument when a note should start and end, but they don’t give you a good visual gauge of what’s actually going on.
Once you render that MIDI to audio, it’s a totally different situation, because you can clearly see the waveform’s ADSR (Attack, Decay, Sustain, Release).
This visual feedback is invaluable for precise editing. When you can see the waveform, you can check the relative amplitude of individual notes, spot rogue volume spikes, and see exactly how the energy is distributed over time. When you’re layering sounds - like stacking multiple kicks or bass synths - seeing the waveforms allows you to identify and correct phase issues that might be hollowing out your low end.

Nailing the Timing and Transients
Just because a MIDI note is perfectly snapped to the grid doesn’t guarantee the audio it triggers hits in time. Sometimes the audio isn’t perfectly aligned with how the MIDI events are displayed, or it drifts out, and it’s not always obvious why.
Timing issues can come from hidden DAW settings, software instrument quirks (like a patch with a slow attack or something else shaping the envelope), delay compensation issues, buffering lag, or random bugs. As a result, the musical information may be slightly out of sync with the rest of your track. It might not be obvious at first; it may sound fine when you create it, then develop issues when your mix gets heavy with dozens of other tracks and hungry processor plugins. Sometimes you’ll notice something’s not quite right, then you’re forced to spend the next 20 minutes troubleshooting to find and fix the problem.
When you bounce to audio, the DAW renders exactly what the track outputs. Once bounced, you’ll occasionally notice the transient is slightly ahead of or behind the grid. Because you can see what’s going on, you can nudge that transient into the right place, locking the groove in the way you want. If you have multiple tracks left as MIDI, you might be able to make a noticeable difference to the feel of the track by committing them and touching up the timing.
Freeing Up Processing Power
Software instruments, especially those with massive sample libraries or complex processing, require a lot of CPU and RAM. One synth might be fine, but as you build a large session with dozens of MIDI tracks, they all add up to create a massive processing load. This can quickly choke your session, leading to playback errors, latency, and frustrating crashes.
By contrast, playing back a simple .wav or .aiff audio file is light work for any modern computer. Getting in the habit of bouncing heavy software instruments to audio means your sessions will run smoothly and stay lighter for longer, letting you keep adding layers and plugins without your computer grinding to a halt.
Note: Committing doesn’t mean you have to delete the software instrument track and all the specific settings you’ve dialled in. In Pro Tools, I usually select “Hide and Make Inactive” on the instrument track when I commit to audio (most other DAWs have similar features). This deactivates the software instrument, removes the CPU load, and hides the track, leaving a lean new track with the bounced audio in its place. If I genuinely need to go back and change a specific setting in the original software instrument later, I can unhide and reactivate it, but because it’s out of sight and out of mind, I rarely feel the need.
Commitment is a Productivity Hack
Perhaps the biggest benefit of bouncing down MIDI is psychological: it builds the habit of making a decision and moving on.
Leaving everything as MIDI “just in case I want to tweak it later” leads to decision fatigue. Every unmade decision remains on your mental to-do list, cluttering your thoughts and preventing you from focusing clearly on the next genuinely important task. In the worst case, the clutter becomes overwhelming and kills your motivation to continue working on the song. What started as a promising idea can quickly become another “this isn’t going anywhere” failed experiment.
Committing forces a workflow shift. You get a sound you like, you print it to audio, and you move forward. Building this habit makes you a much more efficient music-maker. You learn to proceed quickly through technical tasks so you can spend time on the creative work that actually moves the needle, such as songwriting, arrangement, and mixing. If the track ends up developing into something you really like and is close to being finished, you can spend extra time toward the end of the process making those minute adjustments knowing that the fine-tuning is actually worth the effort.
Creative Audio Manipulation
Once your track is in the audio realm, you open up a new range of creative possibilities that are difficult or impossible to achieve with MIDI.
You can chop the audio up, move it, reverse it, apply time-stretching, pitch-shifting, and other effects to different clips using AudioSuite or other offline processing tools. Treating your synth parts like recorded audio samples can lead to happy accidents and entirely new textures that you wouldn’t have discovered while tweaking soft-synth parameters.
Future-Proofing Your Sessions
Finally, bouncing to audio is key for archiving and future-proofing your work.
If you open a session five or 10 years from now, there is a very high chance you might not have the same plugins, subscriptions may have lapsed, or those software instruments might not be compatible with your new operating system. When that happens, even on a single track, your mix will simply not sound the same as the way you left it.
Audio files, however, are universal. A .wav file will practically always open. For this reason, it is a great idea to freeze or commit all tracks that have plugins on them when you finish a mix before you archive it. By committing to audio (or bouncing a freeze file, which is also just audio), you make sure your creative work is preserved exactly as it sounded the day you finished it.
Next time you are working on a track, try printing your MIDI parts as soon as you have a sound you are happy with. See how it frees up your CPU, tightens your timing - and most importantly - keeps your creative momentum moving forward.
ICYMI: My Latest Release
Copycat EP 01 is a collection of covers dedicated to artists who have influenced my musical identity. It was a gratifying creative challenge to transform the songs into something new with the sonic fingerprint of n1ghtmar3cat while retaining what made them special to me in the first place.


If the prospect of converting a MIDI track to audio makes me nervous, I reassure myself by saving the current project with the MIDI track and working with audio in the next version, just in case I need to go back and edit it. While I rarely actually return to it, having that backup is important—and not just for psychological reasons.
Interesting and helpful thanks. A question… say you’re creating / recording vst drums. Ie as midi. Would you split tracks out similarly say to of old (& still I imagine) where mic’s were placed in / at kick drum, over snare etc (to both get a truer sound and reduce spill). And then bounce each track ie kick track, snare track etc to its own audio? And/or would you group drums into sets? Ie kick on own. Toms say as a group? Curious really.